Showing posts with label tote bags. Show all posts

Sunday, September 9, 2012

Christmas Projects
 These last two weeks I've been dreaming up Christmas projects that can be done relatively easily.  Above is a 4" square tote bag blank.  I decorated it with this Aida cloth embroidery which I did on my 4" by 8" embroidery frame.
 When you use an embroidery frame, the cloth will not slip out (unless you give it a really hard yank).  It does, however, move around a bit when you use standard Aida cloth.  I've begun a new approach to the frame:
.
This image is made of craft felt and crushed panne velour.  This is sort of my own style, inspired by church banners and religious hangings.  I have used a stencil to draw in some appropriate flower and leaf designs.  These stencils, by the way, are really meant to be painted over, but you can draw around them to get a general idea of what you want.  On a background of light blue felt and placed a cat cutout of tan felt with clothing of panne velour.  As you can see, I am having to satin stitch around the edges of the velour.  Felt is virually the ONLY fabric you can cut up without it raveling.  Velour and fleece do fairly well, but you still need to satin stitch.

As you can see, I'm only partway through this project.  It will go on another of those tote blanks to make a nice Christmas present.  I'll show how it turns out later.  The good news is that the felt holds almost completely still in the frame, so the work is easy.  The satin stitching is in satin (rayon) embroidery thread which will knot up at the slightest opportunity.  Working it on felt has been easier than usual.  I've made large tote bags this way in the past, but right now I'm just trying for quick, unique  projects for Christmas.
 

Saturday, April 14, 2012

My First Crocheted Tote Bag
Since I haven't yet mastered uploading from Google + after using the creative kit, I've had to make do with the original photo.  I hope you will recognize this as the completed bag made by crocheting two yarns together at once.  It was very easy to make.  I chained 10 to make the bottom and sides, then chained 6 to make the handles.  To get the handles right, I measured the handles on a commercial tote bag.  20" inches, with an extra inch on each side to attach to the bag, seems to do the job.

Naturally, I'll try out the product myself before trying to sell one.  So far, it holds up very well when loaded, though I would not put my car keys in there.  Small items do tend to drop out or get caught in the fabric when you use a US 16 crochet hook.  You also need care in sewing together the pieces.  I tend to have gaps on the horizontal edges of my crocheted work, so I had to be careful not to leave my seam full of holes.  If anyone knows how to solve that problem, please let me know!  I think I'll try my next tote bag using the bulky yarns I've bought.

I am also using the facecloth that was the subject of my last post.  It is proving quite helpful in a somewhat unexpected use. - I know I'm not the only senior in the world who has to contend with dentures.  The adhesive holds much better if you apply it to dry dentures.  I had been looking for a thin, soft cloth that would do the job without immediately stiffening up.  This does the job and is thin enough I can dry all the small spaces.  Make some for your older friends; they'll appreciate it!

I also have ordered some new cotton mixture spring yarns for Peaypatch and will be announcing them shortly.  Please forgive my relatively small inventory, friends; I'm starting on a shoestring!

Tuesday, April 3, 2012

Crocheting with Two Strands of Yarn at Once
I've blogged about the technique of crocheting two strands of yarn at once to make  a thick, reliable potholder.  In that instance, I used some cheap black yarn as my second thread, so I wasn't too impressed with the results.  That's a good potholder, I thought, but that's about it.

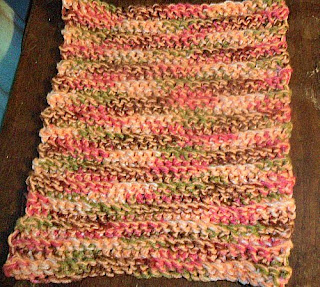
Then I decided to try the technique again, still using washable acrylic yarn.  This time I paired a solid apricot yarn with  a variegated yarn in pink, green, white, and brown.  You see the results above.  What a stunner!  I had chained 30 with my US 16 crochet needle, which I realized was a little too wide for an ordinary potholder.  Also, by jingo, it's too bright and pretty!  I decided to create a tote bag.

To do this, I'll crochet another 12" x 12" section like this one, and three narrower sections to form the sides and bottom.  Then I'll do a couple of lengths of 5 chain crochet for handles.  It will be easy to assemble the bag with a yarn needle, and it will make a striking product - one I hope someone might want to buy.

Using two yarns at once is a simple way to create distinctive color combinations and eye-catching accessories.